Start guide for tenant manager’s
This is our first go at creating a manual for lab managers. As the platform evolves we’ll do our best to keep this page up to date. We’ll also send What’s new mailings, to keep you posted on the changes and we’ll add the changes to this document if needed. As always, any feedback, questions, remarks are always welcome (see contact details below).
- Change access rights
- Help new people getting started
- Create check lists
- Changes machine settings
- Make sure the data is processed correctly
- Add a new lab/workshop manager
Understanding the platform
This menu will change from time to time as we add new features or change things as we see fit. Once you’ve logged in on the platform (your_organisation.toolsquare.io) you should see something like the image on the right (if your working on a desktop, when on mobile use the hamburger menu: three horizonal lines in the top left). If you only see Machines and Jobs your not a tenant manager yet, reach out to us if you should’ve access.
Users and user groups
Once users are registered on the platform they should be assigned to a user group. In research programs it’s probably the team they work for. In an education environment you could assign them by their field of education (ex: Electromechanical Engineering). A user group is only used for data analysis to get a good insight on how a machine is used among the different groups as we don’t want individual users to pop up in those analysis.
Future note: We’re working on api’s to connect the user database to your own CRM system (like an LDAP) so user groups will be extracted from your organisation and don’t have to be managed manually anymore. Reach out if that sounds like something you’re interested in.
Machines
Each machine has a couple of properties (Name, Description,..) and settings (Time to lock,..). The Toolsquare team will initially help you with setting all these values, but feel free to change them as you start using the platform and the scope starts to change (moving form a POC to a full lab/department/site/…). Feel free to reach out if you’re in doubt or if you would like some advice on what would work best for you.
General machine properties
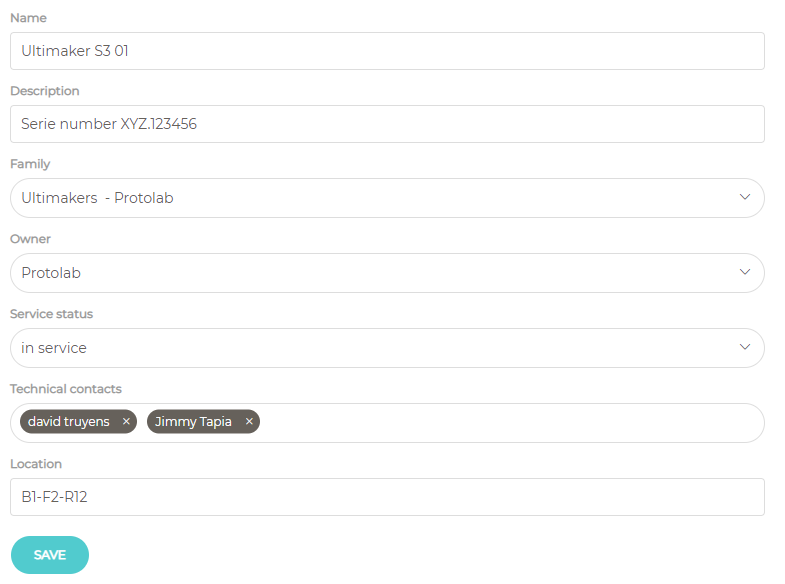
Machine Name
This is the name that will be shown on the Toolsquare unit. It should be unique so you can track each individual piece of equipment. Since we tried to make the unit as compact as possible we restricted a machine name to a maximum of 20 characters.
Description
Here you can add anything you want. It’s only shown on the platform. You could add a serie number and specifications so you’ll have it at hand if you need to contact your supplier.
Machine family
The first one is probably the most important. Access rights are given on a machine family level (so you don’t have to grant access to each 3D printer individually). A second thing a family is used for is data analysis, more on that in the data analysis topics further down in the document.
So a machine family could be something like “Centrifuges” or “3D printers”, but could also be more refined: “Centrifuges – A-team” or “Ultimakers – Common tools”.
In smaller labs you’ll probably have a family for each type of machine. In more complex organisations you would like to control if someone form a different department is going to use your equipment.
Owner
The owner of a machine is typically the organisation who’s in charge of the equipment. In the platform this could help to easily find your equipment in the list, but we also use this to create insights on the usage of the machines in the data analysis.
Service status
Here you can toggle between In service or Out of order. When out of order the machine is blocked and no one can use the equipment until it’s back in service. If you need to do maintenance it’s also possible to switch our unit into a disabled mode (more on that further down below on machine settings).
Technical responsible
Toolsquare gives the possibility to each user to put a machine out of order, this to avoid more damage to a machine or help with keeping the environment safe. One a machine is put out of order via our units, the technical responsible receives a mail saying: “person X at moment Y put machine Z out of order”. The technical responsible person then can contact person X to ask for a reason and make sure everything is back in order before enabling the machine again (see the topic of settings further down below). By default all lab/workshop mangers (called tenant managers in the platform for now) are assigned as responsible. In bigger organisations that creates a mess because you’ll receive mails on machines you don’t have anything to do with. So if you assign someone (anyone who’s registered a user on the platform) as responsible, only they will receive the out of order mail.
Location
The location is a free field where you can add the room number or any other name that would help by tracking down the equipment. This will also be used in the data analysis to get an idea on how a certain location is being used.
So with all this in mind you could have something like this:
Machine settings
There are a lot of machine settings. Most of them you won’t need unless your installing a Toolsquare unit yourself (if so check our DIY guide INSERT LINK). But the 3 of them could be very useful and easy to change:
Idle To Locked TimeOut
Probably the most important one. If a machine is idle the unit will show a progress bar, once the bar runs out the machine will be locked again. Sometimes you would like to make that timeout longer (or shorter), it could be that you need more time to configure the machine to start a job. So feel free to change this value (hh:mm:ss).
Disabled
When you turn this value on (the slider becomes green) the Toolsquare unit is bypassed and you don’t need to badge anymore to use the machine. This is intended for 2 use cases: setting up a new lab OR maintenance. Don’t use it for other purposes as we won’t track how the machine is used and you could get strange data in the end.
Out of Order
If there’s an issue with a machine you can put it out of order. Don’t worry if someone is using the machine at that moment, we’ll put it out of order once the machine is locked (so our unit is in it’s home state).
A machine could also be Out of Order because a user put it in that state via the Toolsquare unit. In that case the tenant managers OR the technical responsible should’ve received a mail (see technical responsible above).
Onboarding
As Toolsquare we try to make the whole process as least intrusive as possible and even reduce the time needed to get started with a machine (no need to fill in a log book for example). But the first time someone is confronted with our unit and can’t use the machine they are used to use this could create frustration. So the onboarding is a critical part in the whole process. We’ve prepared an onboarding mail that you can adapt to your own needs to help people get started insert link to onboarding template!!.
For some machine (families) you would only like to check how they are used and is there no need to block access. You can contact us an we could add that family to the list.
Managing the access rights
One of the most important tasks of a tenant manager off course is to give people acces to the machines. To do this go to the user list and find or search the user (see this tip for using the search box!) your looking for. Select one or more users and click on the three dots on the top. There you should see “Edit access rights”.
Then a window pops up, on top you can see which users you selected. For each family you’ll see if that person has access to a certain family or not (or some if you’ve selected more than one user). Just flip the switch to All or Grayed out to give or deny access for those users, see image below. Don’t forget to SAVE way below on the form, if you click the X your changes won’t be saved!!
Checklists
We recently start rolling out checklist, read this article to learn more about it. Because the feature is quite new we didn’t had the time to build an interface for tenant managers to create them yourself. So reach out if you would like to get started or if you need to change something (like a timeout).
We really would like our customers to explore the possibilities, so happy to have a chat about those to see where we can add value (track certain settings, replace logbooks, track consumables,…). So happy to have a chat (again, contact details below).
Lockers
We’re working with the TUDelft to install our first lockers at their Fablab. This to manage their mobile tools (like drills, angle grinders,…), but we’re also looking for other usage like tracking the access to dangerous/expensive goods. Again reach out if your interested or if you would just like to discuss a potential use case.